
I Was Made Redundant, So I Built a Robot to Find My Next Job
How I turned a daily job-hunting slog into an automated assistant that searches, filters, scores and messages me every morning — and a step-by-step guide to building the same thing without writing a line of code.
This is what was waiting on my phone when I woke up on a Thursday. I didn’t do anything to get it:
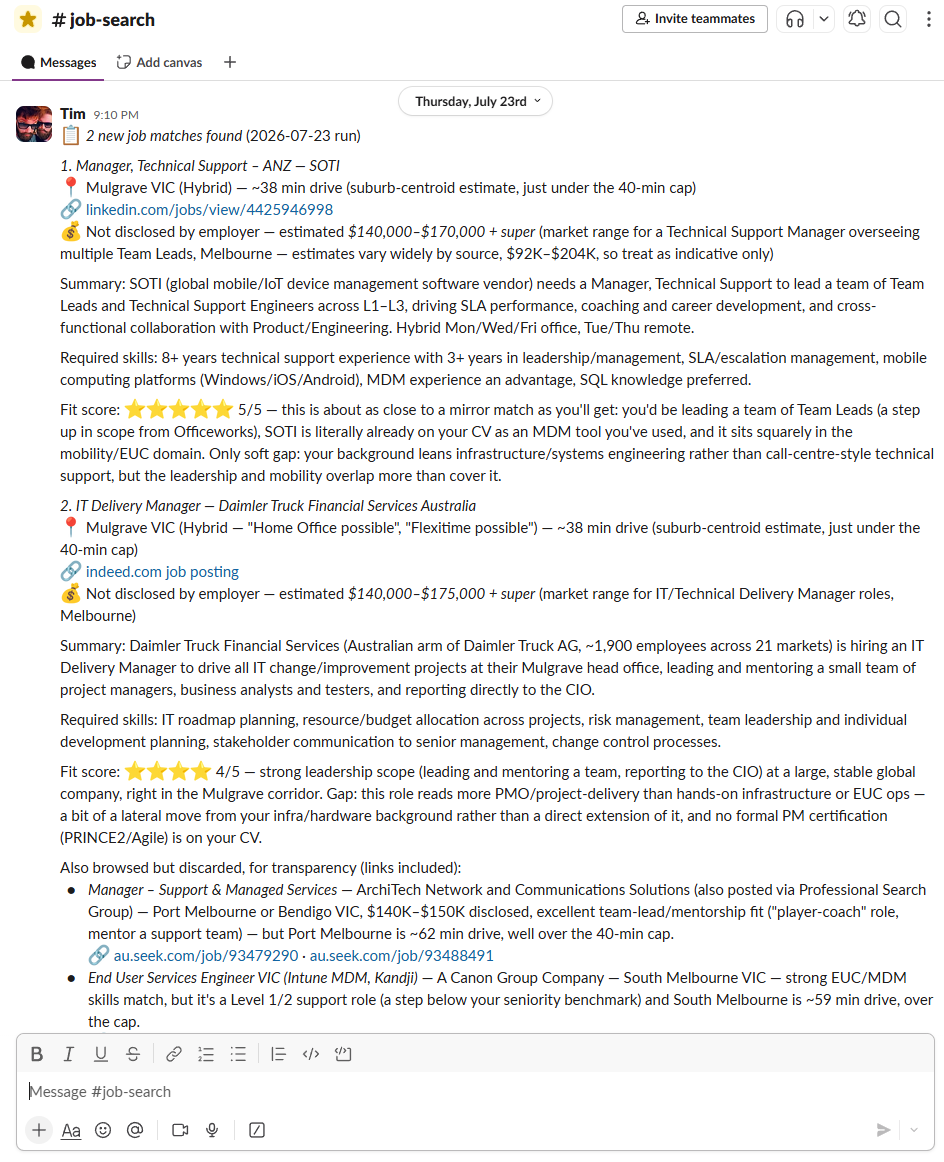
Look at what’s in there. Two roles, each with a real drive time, a salary estimate clearly labelled as an estimate, what the job actually involves, the skills it asks for, and a fit score with an argument attached — “SOTI is literally already on your CV as an MDM tool you’ve used” for the 5/5, and an honest gap for the 4/5: “this role reads more PMO/project-delivery than hands-on infrastructure.”
Then, underneath, the roles it rejected — with reasons and links, so I can overrule it. Sometimes I do.
I built that. I have never written a line of code for it.
Here’s how, and why.
Contents #
- Why I started it
- What it actually does
- How I started it
- Before you begin: the shopping list
- Part 1: Install Claude and find Cowork
- Part 2: Create your project folder
- Part 3: Connect Chrome so it can browse job sites
- Part 4: Set up Slack as your job inbox
- Part 5: Get a free map key for drive times
- Part 6: Teach it who you are
- Part 7: Write the rulebook
- Part 8: Build the searches (learn from my mistake)
- Part 9: Design the notification
- Part 10: Do a supervised test run
- Part 11: Put it on a schedule
- Part 12: Close the feedback loop
- Optional: Turn a routine into a Skill
- Troubleshooting
- What I’d tell you before you start
- Links and further reading
Why I started it #
I was made redundant.
If you’ve been there, you know the first week is a strange mix of relief and dread. And then comes the part nobody warns you about: the sheer, grinding tedium of looking for work.
Every morning I’d open the same three tabs — LinkedIn, Seek, Indeed. I’d run the same searches. I’d scroll past the same jobs I’d already dismissed yesterday, and the day before. Then I’d hit one that looked promising, only to check the address and realise it was ninety minutes away in Tuesday traffic.
The built-in tools on those sites are fine for what they are, but they’re blunt. A job alert can tell me “new IT job in Melbourne.” It can’t tell me:
- Is this actually within a 35-minute drive of my house, on real roads?
- Does it match the kind of work I’m good at — retail tech, end-user computing, hardware, leading a small team?
- Is the salary anywhere near what I need?
- Have I already looked at this one and said no?
I found myself doing all that filtering by hand, three sites at a time, every single day. Hours of work for a handful of genuinely relevant results.
I’ve spent my career in systems engineering and automation. I’ve built things that deploy software to 1,600 payment terminals and manage device fleets across 170 sites. And here I was, copy-pasting job titles into a spreadsheet like it was 2004.
I had engineering skills and I had access to AI tools. It seemed daft not to point the second thing at the first problem.
So I automated it.
What it actually does #
Every weekday at 5:30am, before I’m awake, it runs this:
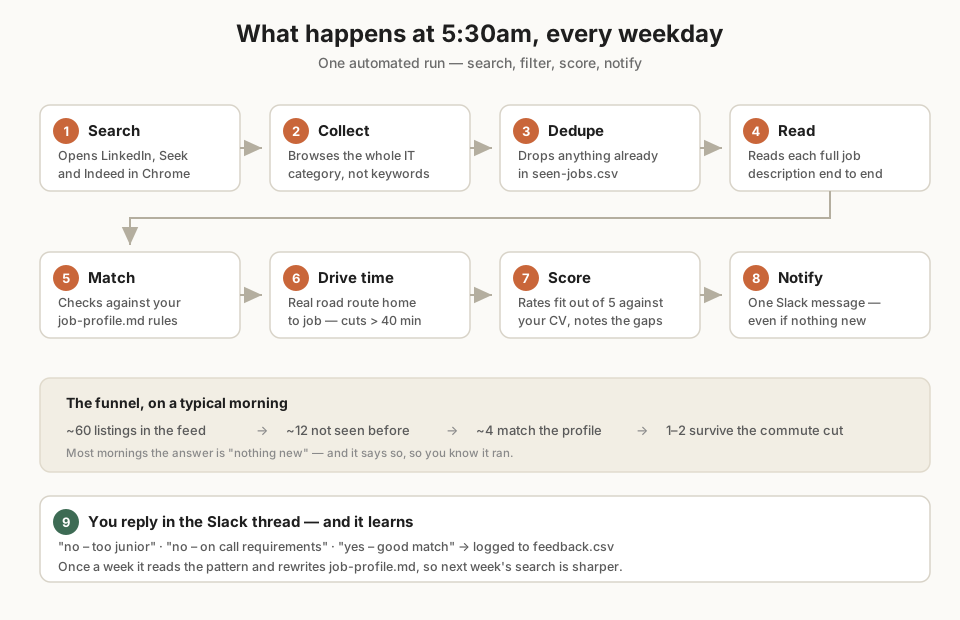
The output is the one Slack message you saw at the top. Some mornings it has two jobs in it. Most mornings it has none — and it says so anyway, so I know it ran rather than wondering whether it died at 5:31am and I’ve been waiting on a dead process for a week.
It also owns up when something breaks. A recent run led with “Indeed was blocked by a Cloudflare verification wall all attempts this run” and “LinkedIn briefly logged me out mid-run but recovered on retry.” Job sites don’t love being automated. The important part isn’t that it failed — it’s that it told me, instead of quietly returning fewer results and letting me assume the market was quiet.
What it actually found #
In the first few weeks it surfaced roles I’d have missed entirely — including an Infrastructure Delivery Lead position 16 minutes from my house that I’d never have found with a keyword search, because the title didn’t contain any of the words I’d have thought to type.
That’s the real win. Not the time saved, though there’s plenty. It’s that the machine doesn’t get bored at listing number forty and start skimming.
How I started it #
Here’s the part I want to be clear about, because it’s the bit people don’t believe: I didn’t write any code for this.
Not one line. I described what I wanted in plain English, and the assistant built and now runs the whole thing. If you can explain your job search to a friend over coffee, you can build this.
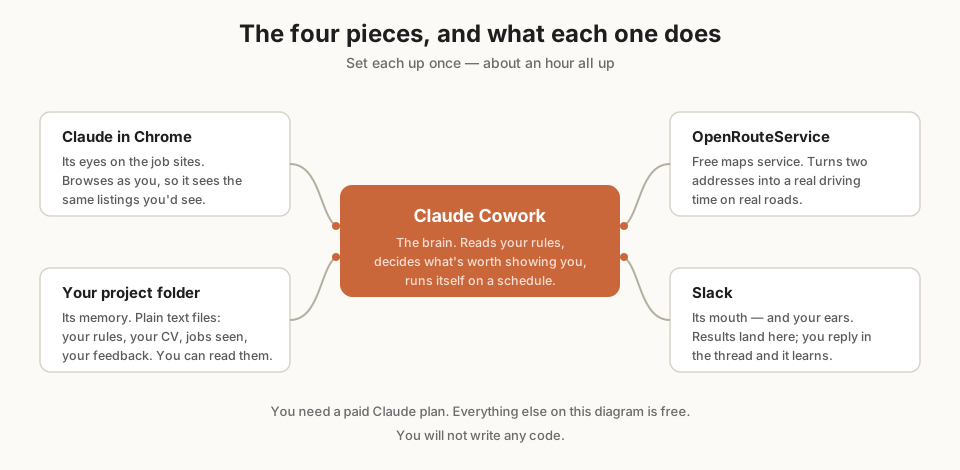
What you’re really doing across the next twelve parts is:
- Giving an AI assistant a folder on your computer to work in
- Giving it permission to browse job sites in your Chrome
- Giving it a way to message you
- Writing down — in plain English, in a file — what you want and how to decide
- Telling it to do all that every morning
Here’s how the pieces fit together:
Before you begin: the shopping list #
| What | What it’s for | Cost | Link |
|---|---|---|---|
| Claude desktop app with Cowork | The brain that runs everything | Paid Claude plan (Pro, Max, Team or Enterprise) | claude.com/download |
| Claude in Chrome extension | Lets it browse job sites as you | Free with a paid plan | Chrome Web Store |
| Slack workspace | Where results land, where you reply | Free tier works | slack.com/get-started |
| OpenRouteService account | Free driving-time calculations | Free | openrouteservice.org |
| Your CV | So it can score jobs against real experience | You already have it | — |
Time to set up: about an hour, unhurried. Then it runs itself.
A word on plans. Cowork needs a paid Claude subscription — it isn’t on the free tier. Availability of individual features (especially the Slack connector) has shifted as these products evolve, so check Settings → Connectors on your own account rather than taking any blog post’s word for it. Part 4 includes a fallback if Slack doesn’t work out for you.
Part 1: Install Claude and find Cowork #
1.1 Install the desktop app #
Go to claude.com/download and install the app for Windows or Mac. If you already have it, update it — Cowork needs a recent version, and this is the single most common reason people can’t find the features below.
Sign in with your Claude account.
1.2 Switch from Chat to Cowork #
Chat and Cowork share the same home screen. Look at the message box at the bottom — there’s a selector on it. Click it and choose Cowork.
That’s the whole switch. Chat answers questions; Cowork takes on jobs, touches your files, and keeps working across many steps. You want Cowork.
1.3 Understand the three permission modes #
Before you let it loose, know how it checks in with you. There’s a mode selector in the chat box with three settings:
| Mode | What happens | When to use it |
|---|---|---|
| Manual | Asks permission before each action | While you’re setting up and testing — start here |
| Auto | Works uninterrupted, but safety-checks each action and blocks anything unsafe | Day-to-day running, once you trust the setup |
| Skip | No pausing, no checking | Honestly — don’t, for this |
Start in Manual. You’ll approve a lot of clicks the first time, and that’s the point: you get to see exactly what it’s doing on your LinkedIn account before you hand over the keys. Move to Auto once it’s boring.
📖 Full detail: Get started with Claude Cowork
Part 2: Create your project folder #
Everything the assistant knows and remembers lives in one ordinary folder on your computer. You can open it, read it, edit it, and back it up. Nothing is hidden.
In the Claude desktop app, find Projects in the left sidebar and click the + button. You’ll get three options:
- Start from scratch — creates a new folder. Pick this one.
- Import from a Claude project — pulls in files from an existing chat project
- Use an existing folder — points at a folder you already have
Choose Start from scratch, name it Job finder, and pick where to save it.
Then drop your CV into that folder.
Projects give you four things that matter here:
- Instructions — standing rules for every task in the project
- Context — the local folder Claude reads and writes
- Memory — it remembers what it learned in this project, scoped to this project only
- Scheduled tasks — recurring runs attached to this project
📖 Full detail: Organize your tasks with projects in Claude Cowork
Part 3: Connect Chrome so it can browse job sites #
This is what lets the assistant actually open LinkedIn and read listings — as you, logged in, seeing what you’d see.
3.1 Install the extension #
- Open Google Chrome (it has to be Chrome — other Chromium browsers aren’t supported)
- Go to the Claude extension on the Chrome Web Store
- Click Add to Chrome
- Sign in with your Claude account when prompted
- Pin it: click the puzzle-piece icon in the toolbar, then the pin next to “Claude”
- Grant the permissions it asks for
3.2 Turn on the connector in the desktop app #
Installing the extension isn’t enough on its own — you also have to enable it as a connector so Cowork can drive it:
- In the Claude desktop app, click your initials in the lower left, then Settings
- Go to Connectors
- Find Claude in Chrome and click Configure
- Toggle it on
⚠️ It’s off by default in each new conversation. Once enabled in settings, Claude in Chrome appears in the Connectors dropdown on your chats — but you need to switch it on for the conversation you’re working in. If the assistant tells you it can’t browse, this is nearly always why.
3.3 Log into the job sites #
In that same Chrome browser, log into LinkedIn, Seek and Indeed as yourself. The assistant uses your existing sessions. It sees the jobs your account sees.
⚠️ Worth knowing: this extension can click, type and navigate on your behalf. That’s exactly what makes it useful here, and it’s also a real capability worth respecting. Read Using Claude in Chrome safely before you turn it loose, and keep it in Manual mode until you’ve watched it work a few times.
📖 Full detail: Get started with Claude in Chrome
Part 4: Set up Slack as your job inbox #
Why Slack rather than email? Two reasons. First, it keeps job stuff out of an inbox that’s already full of recruiter spam. Second — and this is the one that matters — Slack has threads, and threads are how the feedback loop works. You reply under a job, the assistant reads the reply, and your criteria improve.
4.1 Create a workspace and a channel #
If you don’t already have a Slack workspace you can use:
- Go to slack.com/get-started and create a free workspace. Two minutes. It can be just you — that’s fine.
- In the sidebar, click + Add channels → Create a new channel
- Name it
#job-search - Leave it private if you like — you’re the only member
That channel becomes your job-hunting inbox. One place, nothing else in it.
4.2 Connect Slack to Claude #
First, install the Claude app into your Slack workspace — there’s an Install button for Slack on the Claude download page, under “Claude Cowork surfaces.” Approve the permissions it asks for.
Then enable the connector:
- In the Claude desktop app, click your initials → Settings → Connectors
- Find Slack in the list
- Click Connect
- Log into Slack and approve the permissions
- Return to Claude
⚠️ Two caveats worth knowing upfront. Claude’s Slack integration may require the Claude app to be installed in your Slack workspace first, and on a work Slack you’ll likely need an admin to approve it. Availability across plan tiers has also changed over time. Check what your account offers at claude.ai/settings/connectors.
4.3 Test it before you build on it #
Don’t assume. In Cowork, ask:
Send a test message to my Slack channel #job-search saying “job finder connected”, then read the channel back to me to confirm it arrived.
If that round-trip works, you’re set. This is the step people skip and then spend an hour debugging later — it’s worth thirty seconds now.
4.4 If Slack doesn’t work for you #
No Slack? The pattern still works, it just gets a bit more manual:
- Write to a file. Have it append results to
daily-results.mdin your project folder. You open the file each morning, and you give feedback by typing replies straight into it. - Use email if you have an email connector available.
You lose the tap-to-reply convenience, not the concept.
📖 Full detail: Slack integration docs · Get started with connectors
Part 5: Get a free map key for drive times #
Straight-line distance is a lie. Two jobs the same distance from your house can be a 15-minute run or a 50-minute crawl depending on which side of a river, freeway or level crossing they sit on. Filtering on “within 25km” throws away good jobs and keeps bad ones.
OpenRouteService is a free, open-source routing service built on OpenStreetMap data. It’ll tell you the real driving duration between two addresses.
5.1 Sign up #
- Go to openrouteservice.org and sign up for an account
- Once you’re in the developer dashboard, request a free Standard API key
- Copy the key — it’s a long string of characters
The free tier is generous: the directions endpoint allows on the order of 2,000 requests per day, and you’ll use maybe a dozen. Your remaining quota shows in the dashboard.
5.2 Store the key safely #
Do not paste your API key into a chat message. Instead, ask the assistant to create a file in your project folder:
Create a file called
ors-config.jsonin this folder with a placeholder for my OpenRouteService API key and my home address. I’ll fill it in myself.
Then open that file and paste the key in yourself. Add a line to your project instructions saying the key lives in that file and must never be repeated in chat or saved to memory.
Same principle for your home address: it belongs in a file on your own computer, not in a chat log and not in a blog post.
5.3 Test it #
Using the API key in ors-config.json, work out the driving time from my home address to Melbourne CBD.
If you get a plausible number back, the plumbing works.
📖 Reference: ORS API restrictions and limits
Part 6: Teach it who you are #
Now the content. Two files do the thinking: one about you, one about what you want. This part is the “you” one.
Ask the assistant:
Read my CV in this folder and write a file called
candidate-profile.mdsummarising my roles, my top skills, my domain experience, and — importantly — my honest gaps relative to typical postings in my field. Add a short guide at the end for how to score a job 0–5 stars against this profile.
Then read what it wrote and correct it. It’ll get some things wrong or overstate them. That’s the point of reading it.
Why the gaps section matters most #
The temptation is to let it write your profile the way you’d write a cover letter. Resist that. My profile explicitly lists what I don’t have — no backup/DR tooling like Veeam or CommVault on record, no SharePoint administration, no BigFix specifically.
Why? Because when it scores a job I want it to say “4 stars — strong overlap on endpoint management and retail hardware, but they want backup tooling you haven’t listed.” Not a bare number. Not a job silently binned because of one missing line item, and not a five-star rating on a role I’d get filtered out of at screening.
A profile that flatters you wastes your mornings.
Part 7: Write the rulebook #
This is the highest-leverage part of the whole build, and the one most people rush.
Everything the assistant needs to know goes in one file it reads at the start of every single run. In a Cowork project, that’s your project instructions (a CLAUDE.md file in the folder). It’s the difference between a system that works on Monday and a system that still works in six weeks.
Ask it to create the file, then make sure it covers all of this:
Target roles #
Be specific about the kind of work, not just titles. Mine:
- Team lead / low-level management with a mentorship element
- End User Computing (EUC)
- Mobility-focused technology
- Retail / POS technology
- Hands-on hardware roles
Seniority benchmark #
Name your last two roles and say “match this level or a step above.” This is far more useful than the word “senior,” which means nothing consistent across companies.
Company and salary filter #
- Company size: medium to large
- Salary: eleventy million dollary doos (sorry — I don’t want to tell the world what my actual minimum is)
Put your real number in your own file. It’s one of the most effective filters you have.
Location and commute #
- Home address (kept in your config file, not in the instructions)
- Preferred: ≤ 25 minutes
- Maximum: ≤ 40 minutes — discard anything over
- The exact method for calculating it, so every run does it the same way
Work arrangement #
Mine says hybrid only — on-site-only and fully remote are both out of scope. Decide yours and write it down, because it dramatically narrows the field.
The per-run workflow #
Number the steps. Literally 1 through 11. Read criteria → check for replies → load searches → extract listings → dedupe → read descriptions → drive-time check → log → enrich → notify → confirm. When a run goes wrong, a numbered list tells you exactly which step broke.
Which files do what #
List them, with one line each on what’s in them:
| File | What it holds |
|---|---|
CLAUDE.md |
The rulebook — read at the start of every run |
candidate-profile.md |
Your skills and gaps, for fit-scoring |
job-profile.md |
Current search criteria, updated weekly from feedback |
seen-jobs.csv |
Every job ever surfaced, so nothing repeats |
feedback.csv |
Your yes/no answers and reasons |
ors-config.json |
Map key and home address — secret |
💡 The habit that makes this work: every time you notice the assistant doing something annoying, don’t just correct it in chat — add a line to the rulebook. My file has grown to several pages, and almost every paragraph in it exists because something went wrong once. It even has dated notes about things that used to be broken and now aren’t, so future runs don’t work around problems that no longer exist.
Part 8: Build the searches (learn from my mistake) #
I got this wrong first time. Save yourself the fortnight.
What I tried first: keywords #
“EUC engineer.” “Infrastructure lead.” “POS support.” Sensible-sounding. Terrible in practice — it missed good roles constantly, because companies name jobs whatever they feel like. “Digital Workplace Specialist” is an EUC role. “Technology Services Team Lead” is exactly what I want. My keyword list caught neither.
What actually works: browse the whole category, then read #
Point it at the entire IT/ICT job category near you, then have it read each description and judge it against your profile. Slower per job, dramatically better recall. The 16-minute-away role I mentioned earlier? Found this way. Invisible to keywords.
Build reusable search URLs #
Ask the assistant to construct a saved search URL for each site with these filters applied, then save those URLs in your rulebook so every run uses the identical search:
- Job category (IT / ICT)
- Your location
- A radius — 25km is a good coarse net; the real filtering is drive time
- Hybrid only, if that’s your preference
- Posted in the last 24 hours (or 3 days, to be safe against a missed run)
Mine look roughly like this in shape — yours will differ by location:
LinkedIn: linkedin.com/jobs/search/?distance=25&f_F=it&f_TPR=r86400&f_WT=3&geoId=<your area>
   f_F=it      → Information Technology job function
   f_TPR=r86400 → posted in the last 24 hours
   f_WT=3      → hybrid only
   distance=25 → 25km coarse radius

Seek: au.seek.com/jobs-in-information-communication-technology/in-<Your-Suburb>/hybrid?daterange=3
   daterange=3 → posted in the last 3 days
You don’t need to understand those parameters. Ask the assistant to build them: “Set up the filters I want on LinkedIn’s job search, then save me the resulting URL.”
Why save them? Because if it rebuilds the search from scratch every morning, the search drifts. Filters get dropped, the location resolves differently, and one day you’re getting Sydney jobs. A fixed URL is a fixed experiment.
🔧 Known rough edge: Indeed doesn’t expose the same tidy category-browse URL, and its listings often don’t carry a clear hybrid/remote tag. Mine still uses keyword search there, and I treat missing work-arrangement tags as “check manually” rather than “exclude.” Write your known limitations into the rulebook so you remember they’re limitations, not bugs.
Part 9: Design the notification #
Tell it exactly what a job alert must contain. Mine:
- Title, company, location
- Estimated drive time
- The link
- Salary — the disclosed figure if given, otherwise a market estimate clearly labelled as an estimate
- Two or three sentences on what the role actually involves
- Required skills, as listed in the posting
- Fit score out of 5, with a sentence on what matches and what doesn’t
Three rules I learned the hard way:
1. Always include the link. For every job. Including rejected ones. My first version mentioned near-misses — “discarded this one, 45 minutes away” — without links, and I had no way to click through and check whether it was right. It wasn’t always. Now every job it names gets a link, rejected or not.
2. Always send something. Even on a zero-match day it posts “ran today, nothing new.” Silence is ambiguous — did it find nothing, or did it break at 5:31am and I’ve been waiting on a dead process for a week? A one-line confirmation removes the doubt entirely.
3. Never a bare score. “3/5” tells me nothing. “3/5 — strong on endpoint fleet management, but it’s a pure service-desk role with no team lead component” tells me everything, and I can disagree with it.
Part 10: Do a supervised test run #
Don’t schedule it yet. Run it once, in Manual mode, and watch.
Run today’s job search now, following the workflow in the project instructions. Show me what you find at each step before you send anything to Slack.
Check four things:
- Did it find the jobs you’d have found? Open the search URL yourself and compare. If it missed obvious ones, your search is too narrow.
- Are the drive times plausible? Spot-check one against your own knowledge of the roads. If a 30km trip is coming back as 12 minutes, something’s misconfigured.
- Do the fit scores make sense? Argue with one. If you can’t tell why it scored something 4/5, the scoring guide in your candidate profile needs work.
- Did the Slack message arrive, with links?
Fix what’s wrong, write the fix into the rulebook, and run it again. Two or three iterations is normal. Only schedule it once a supervised run comes out clean.
Part 11: Put it on a schedule #
Now automate it. Two ways:
The easy way — type /schedule in any Cowork task and describe what you want. It’ll ask you a few questions and set it up.
The manual way:
- Click Scheduled in the left sidebar
- Click New task in the upper right → Set up manually
- Fill in:
- Task name — e.g.
job-finder-daily-search - Prompt — “Run the daily job search following the instructions in the project folder”
- Approval mode — Auto, once you trust it
- Frequency — daily, weekdays, weekly, hourly, or manual
- Folder — your Job finder project folder
- Task name — e.g.
- Click Save
Mine runs weekdays at 5:30am. The results are waiting when I pick up my phone.
⚠️ One important limitation, and it’s the one that tripped me up. Many scheduled tasks run remotely, without needing your computer awake. But a task that needs local files or your browser — like this one does, on both counts — has to run on your machine. Anthropic’s own FAQ is blunt about it: “The desktop app needs to be running for Claude to complete tasks. If your computer is asleep, Claude won’t be able to work.” So pick a time your computer is actually on, and check your sleep settings before you trust a 5:30am run.
Weekdays-only is worth it. Job postings barely move on weekends, and you’re allowed a Saturday off from job hunting.
📖 Full detail: Schedule recurring tasks in Claude Cowork
Part 12: Close the feedback loop #
This is what turns a search tool into something that gets better. It’s also the part that takes you ten seconds a day.
You reply in the thread #
When a job lands in Slack, reply in the thread under it. A few words is plenty:
no - on call requirements
no - too junior
yes - good match for my skills
not a good match
Short is fine. Don’t write essays — the value is in the pattern across many replies, not the depth of any one.
It logs every reply #
Every run, before searching, it checks the channel for new thread replies and appends them to feedback.csv:
url,title,company,response,reason,timestamp
https://au.seek.com/job/9281xxxx,Senior EUC Engineer,<company>,yes,good match for my skills,2026-07-06T12:10:45+10:00
https://au.seek.com/job/9319xxxx,Senior Systems Engineer,<company>,no,on call requirements,2026-07-09T19:07:50+10:00
Checking every run matters — replies you leave on a Wednesday afternoon shouldn’t wait until Sunday to be captured.
It reviews weekly, not daily #
Once a week, it reads the accumulated feedback, looks for patterns, and updates job-profile.md:
- Rejected two roles for on-call requirements → on-call becomes an avoid-flag
- Said yes to three roles at similar companies → that company type becomes a preference
- Repeatedly rejected roles as “too junior” → the seniority floor moves up
The weekly cadence is deliberate. If it updated after every single reply, one grumpy “no” on a Tuesday would knock the whole search sideways. A week of answers shows real patterns instead of moods. Daily runs just consume the current criteria; they don’t re-derive them.
Optional: Turn a routine into a Skill #
Once you’ve been running this a while, you’ll notice sub-routines you keep re-explaining. Mine was the drive-time calculation: geocode the home address, geocode the job address, call the routing service, compare against thresholds. Fiddly, identical every time.
That’s what Skills are for. A Skill is a folder with instructions in it that Claude loads only when the task calls for it — so it doesn’t clutter every conversation, but it’s there when relevant.
What a Skill actually is #
At minimum, one folder with one file:
drive-time-check/
└── SKILL.md
And SKILL.md looks like this:
---
name: drive-time-check
description: Calculate real driving time between a home address and a job
  location using OpenRouteService, and compare against commute thresholds.
---

# Drive Time Check

Use this whenever a job listing needs to be filtered by commute time.

## Steps
1. Read the API key from `ors-config.json` — never print it.
2. Geocode the home address (cache the result; it doesn't change).
3. Geocode the job's listed address.
4. Request the driving duration between the two points.
5. Compare: ≤ 25 min = preferred, ≤ 40 min = acceptable, > 40 min = discard.

## Notes
- If the job lists only a suburb, geocode the suburb centre and flag the
  result as approximate.
- Cache results per employer location — repeat employers are common.
Two required fields in that header block: name (lowercase, hyphens, must match the folder name) and description (what it does and when to use it — this is what Claude reads to decide whether to load it; keep it under 200 characters for Claude.ai).
How to make one without writing it yourself #
You don’t have to hand-write any of that. Ask:
Create a skill called
drive-time-checkthat handles the commute filtering steps we’ve been doing, and save it so it’s available in future sessions.
Then read the file it produced and tweak the wording.
Three rules that make Skills work #
- One job per skill. Several focused skills compose better than one that tries to do everything. Claude can use them together.
- The description does the work. If a skill never triggers, the description is too vague. Add the words you’d naturally use when asking for it.
- No secrets inside. Skills reference where the key lives; they never contain it.
Keep the main file under 500 lines. Longer reference material goes in separate files the skill points to.
📖 Full detail: Creating custom skills · Skills overview
Troubleshooting #
“It says it can’t access my browser.”
The Chrome connector is off for that conversation. It defaults to off in each new chat even after you’ve enabled it in Settings. Switch it on in the Connectors dropdown. Also confirm Chrome is actually open — and that it’s Chrome, not Edge or Brave.
“It keeps showing me the same jobs.”
The dedupe log isn’t being read or written. Check that seen-jobs.csv exists in the folder, has content, and that step 5 of your workflow explicitly says to read it before processing.
“The scheduled run didn’t happen.”
A task that touches local files or your browser needs your computer awake and the desktop app open. Check the run history under Scheduled in the sidebar — it’ll show you whether it attempted and failed, or never started.
“It found nothing for days.”
Usually the search is too tight. Widen the date range, drop the hybrid filter temporarily, and run it manually to see the raw feed. Then check: is the feed empty, or is the filter eating everything? Have it show you what it discarded and why.
“The drive times look wrong.”
Confirm it’s geocoding the right place — suburb names repeat across states, and “Richmond” alone will happily land you in the wrong one. Include state and postcode in addresses.
“I’m burning through my usage limit.”
Cowork uses more than chat, and Auto mode uses more than Manual. Once at 5:30am is enough — I started at three runs a day and it was overkill. Reading fifty full job descriptions is the expensive part, so tighten the date range before you widen anything else.
What I’d tell you before you start #
Write everything down in the folder. Don’t tell the assistant what to do in a chat and hope it sticks. Rules, process, lessons — all of it in a file it reads at the start of every run. This is the single biggest difference between something that works once and something that still works in a month.
Expect to correct it. My first version had no links, keyword searches that missed half the market, and a silent-on-no-results rule that had me checking whether it was still alive. Every one of those got fixed by noticing the annoyance and writing down the fix. Budget for three or four rounds of this.
Be honest in the profile. The gaps section is the most useful part of mine.
Guard the secrets. API key and home address in a file on your machine, referenced by name, never pasted into chat and never saved into memory. Say so explicitly in your instructions.
Watch it before you trust it. Manual mode, a few supervised runs, then Auto. You’re giving something permission to browse the web while logged into your accounts — that deserves a couple of mornings of your attention up front.
It doesn’t apply for you, and it shouldn’t. This finds and filters. The application, the cover letter, the conversation — that’s still you, and it should be. What you get back is your mornings, and a shortlist worth actually reading.
The honest summary #
I lost a job and gained a very persistent assistant that reads every IT posting within 40 minutes of my house before dawn, throws out the 95% that don’t fit, and hands me the rest with a fit score and a link.
It took an afternoon to set up and a couple of weeks of small corrections to get right. It’s found me roles I’d never have typed the right words to discover.
If you’re in the middle of a job search and drowning in tabs — this is the bit you can hand off.
Links and further reading #
Setting up the tools
- Get started with Claude Cowork — permission modes, capabilities, limitations
- Download Claude Desktop
- Organize your tasks with projects in Claude Cowork — creating the project folder, screenshots included
- Get started with Claude in Chrome — installation and the full permissions table
- Claude in Chrome on the Chrome Web Store
- Using Claude in Chrome safely — read this one
- Schedule recurring tasks in Claude Cowork
Connectors and Slack
Skills
- Skills overview
- Creating custom skills — the
SKILL.mdformat - Example skills on GitHub — templates to crib from
- Agent Skills specification
Maps and drive times
- OpenRouteService
- ORS API restrictions and free-tier limits
- ORS API playground — poke at it before you automate it
The pattern here generalises well beyond job hunting. Anything that means checking the same sources on a schedule, filtering against personal criteria, and wanting to be told only when something’s genuinely new — same twelve steps, different rulebook.