
I Built a Touchscreen Macro Pad from a Cheap ESP32 Screen (and You Can Too)
How I turned a small ESP32 touchscreen board into a Bluetooth macro pad that copies, pastes, types my email signature and runs my music, set up from a web page on my phone. Includes everything the board gets wrong, and a step-by-step guide to building your own.
This is what sits next to my keyboard now:
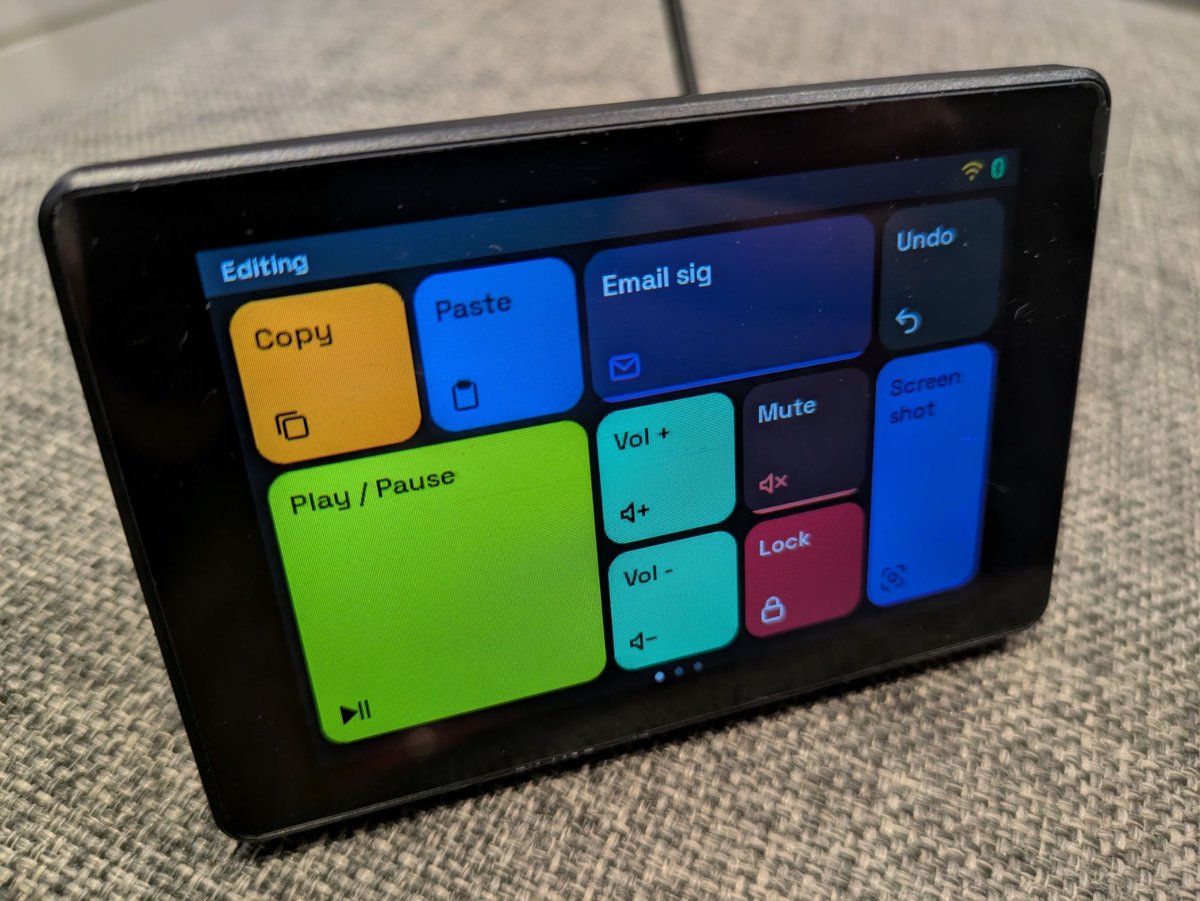
Tap Copy and it copies. Tap Email sig and it types my whole email signature, line breaks included. The big green tile plays and pauses whatever’s playing. Swipe left and there’s a page for media, and another for code.
As far as my computer is concerned, it’s just a Bluetooth keyboard. There’s no driver, no companion app and nothing running in the system tray. It works on Windows, macOS, Linux and my phone.
When I want to change a tile, I open triggergrid.local in a browser, drag tiles around, and hit save. The pad updates a second later.
It’s called TriggerGrid. The whole thing, firmware and web page, is on GitHub. Here’s how I built it, what the board fought me on, and how to build your own.
Contents #
- Why I built it
- What it actually does
- How I built it
- Before you begin: the shopping list
- Part 1: Get the board
- Part 2: Install VS Code and PlatformIO
- Part 3: Flash the firmware
- Part 4: Pair it over Bluetooth
- Part 5: Get it on your Wi-Fi
- Part 6: Build your first page
- Part 7: Type text, including the awkward characters
- Part 8: Lock it down and back it up
- Under the hood: everything this board gets wrong
- The design decision that made it work: thin device, smart browser
- Building hardware with Claude
- Troubleshooting
- What I’d tell you before you start
- The honest summary
- Links and further reading
Why I built it #
I do the same handful of things hundreds of times a day. Copy, paste, undo. Pause the music when someone talks to me. Type the same sign-off at the bottom of the same kind of email. Lock the screen when I walk away.
Macro pads exist for exactly this, and the good ones are lovely. But the touchscreen ones cost a fair bit, and they all want an app running on your computer to work. That’s fine at home. It’s a non-starter on a work laptop where you can’t install anything, and it’s one more thing to keep updated everywhere else.
What I wanted was simpler:
- A touchscreen, so the buttons can be whatever I want them to be this week
- It shows up as a normal Bluetooth keyboard, so it works on any computer with nothing installed
- I set it up from a web page, on my phone if I like, not from a desktop app
- It looks good sitting on my desk, not like a dev board with a sticker on it
And then I found the Guition JC3248W535: an ESP32-S3 with a 3.2″ capacitive touchscreen, Wi-Fi and Bluetooth built in, for not much more than the cost of lunch. Everything I needed was on one board. It just needed software.
So I wrote some. Well, mostly Claude did. More on that below.
What it actually does #
Every tile does one of three things:
| Tile type | What it sends | Example |
|---|---|---|
| Key combo | A keyboard shortcut | Ctrl+C, Win+Shift+S, F13 |
| Type text | A whole string, typed for you | An email signature, a code snippet, Cheers 👋 |
| Media key | A media or volume key | Play/Pause, Next track, Vol +, Mute |
Tiles sit on a grid of rounded “bento” tiles. They can be 1×1, 2×1, 1×2 or 2×2, so the important ones get to be big. There are two grid sizes: Regular (5×3, chunky and easy to hit) and Compact (6×4, more buttons). You can have up to 12 pages and swipe between them.
Around that:
- Set up from a browser. The pad joins your home Wi-Fi and serves its own setup page at
http://triggergrid.local. If it can’t find your Wi-Fi, it starts its own hotspot instead, with a QR code on screen to join it. - It dims itself. After a while it drops to 20% brightness, and five minutes later the screen turns off. A tap wakes it. That first tap only wakes the screen, so you can’t hit a button you couldn’t see.
- Firmware updates over Wi-Fi. Once it’s flashed the first time, new versions go on from the web page. No cable.
- Optional PIN, so nobody else on your network can change what your pad types.
Here’s how the pieces talk to each other:
   Your computer                         Your phone or laptop
   sees a Bluetooth keyboard             runs the setup page
          ▲                                  ▲          │
          │ key presses                      │ page     │ saves your layout
          │ (Bluetooth)                      │          ▼
   ┌──────┴──────────────────────────────────┴──────────────────┐
   │  TriggerGrid (ESP32-S3)                                     │
   │  touch ─► screen ─► tap ─► action queue ─► Bluetooth        │
   │                 ▲                                           │
   │                 └── layout file ◄── web server (over Wi-Fi) │
   └─────────────────────────────────────────────────────────────┘
How I built it #
I’ll be upfront: Claude wrote nearly all of the code. I used Claude Code in VS Code. My job was deciding what to build, reading what it wrote, plugging in the board, flashing it and telling Claude what I saw.
That last part matters more than it sounds. Claude can’t see the screen. When the display showed one blue bar across the top instead of seven colour bands, I was the only one who knew. A lot of this project was me reporting “the corner labels are upside down” or “it’s slow when I swipe”, and Claude working out why.
What made it work was the same thing that makes any AI-built project work: writing everything down in the repo.
CLAUDE.md: the rulebook. Every hard rule about this board is in there, such as never use hardware rotation and only ever send the panel whole frames. Almost every line exists because something broke once.- A hardware doc: every quirk of the board, what the symptom looks like, why it happens and the fix. When something went wrong, the answer was usually already in there.
- A roadmap in milestones: M0 to M10, each one ending with something I could see on the board, and a “Done when” line so there was no arguing about whether it worked.
Each milestone is tagged in git (m1-display, m2-lvgl … v1.0). If you want to see the code at the point where the display first worked, or where touch first worked, you can check out that tag.
Before you begin: the shopping list #
| What | What it’s for | Cost | Link |
|---|---|---|---|
| Guition JC3248W535 board | The whole pad: ESP32-S3, 3.2″ touchscreen, Wi-Fi, Bluetooth | Varies by seller | Search “JC3248W535” on AliExpress |
| USB-C cable | Power, and flashing the first time | You have one | — |
| VS Code | The editor | Free | code.visualstudio.com |
| PlatformIO IDE extension | Builds and flashes the firmware | Free | platformio.org |
| The TriggerGrid code | Firmware and web page | Free | github.com/trati629/TriggerGrid |
| Claude Code (optional) | Only if you want to change the code the way I did | Paid Claude plan | claude.com/claude-code |
Time to set up: about half an hour, most of which is PlatformIO downloading things on the first build.
You don’t need to write any code to build one. Parts 1–8 are flash-and-configure. The code is there if you want to change it, and Under the hood explains the interesting bits if you’re curious.
Part 1: Get the board #
The board is the Guition JC3248W535. Search for that exact model number. Listings are titled all sorts of things (“ESP32-S3 3.5 inch display development board”, “smart display”, “HMI screen”), but the model number is what matters.
What you’re getting:
| Part | Detail |
|---|---|
| Chip | ESP32-S3, two cores at 240 MHz |
| Memory | 16 MB flash, 8 MB PSRAM |
| Screen | 3.2″ IPS, 320×480 (we use it sideways as 480×320) |
| Touch | Capacitive, same controller chip as the screen |
| Power | USB-C |
Some listings include a black plastic case with a built-in stand, the one in my photos. Get one of those. It turns a dev board into something that looks finished on a desk.
⚠️ Check the flash size. You want the 16 MB flash / 8 MB PSRAM version. If a listing offers several memory options, pick that one.
Part 2: Install VS Code and PlatformIO #
- Install VS Code.
- Open the Extensions panel (the four-squares icon on the left), search for PlatformIO IDE, and install it.
- Give it a minute. PlatformIO installs its own tools the first time, and it’ll ask you to reload the window.
That’s it. You don’t need to install Python or the ESP32 toolchain yourself. PlatformIO downloads the right versions for the project on the first build.
📖 Full detail: PlatformIO IDE for VS Code
Part 3: Flash the firmware #
3.1 Get the code #
Clone the repo (or download it as a ZIP from GitHub and unzip it):
git clone https://github.com/trati629/TriggerGrid.git
In VS Code, File → Open Folder and pick the TriggerGrid folder. VS Code suggests the PlatformIO extension when you open it, so you’re in the right place.
3.2 Plug in and upload #
Connect the board with USB-C. Then, in the PlatformIO sidebar (the alien-head icon): guition-jc3248w535 → General → Upload and Monitor.
The first build takes a few minutes. It’s downloading the ESP32 platform, the display library, LVGL and the Bluetooth stack. Later builds take seconds.
The web setup page is built into the firmware, so this one upload is everything. No separate step for the website.
3.3 Check the serial output #
When it’s done, the terminal shows what the board is saying:
TriggerGrid 1.0.0
  Chip:  ESP32-S3 rev 0, 2 cores @ 240 MHz
  Flash: 16384 KB
  PSRAM: 8192 KB (ok)
ble: advertising as "TriggerGrid"
net: no saved network
net: setup hotspot "TriggerGrid-XXXX", password …, http://192.168.4.1
And the screen lights up with the default layout: an Editing page, a Media page and a Code page.
⚠️ If the upload says the port is busy (
PermissionError 13on Windows), an old monitor window is still holding it. Close any other PlatformIO terminals and try again. See Troubleshooting.
Part 4: Pair it over Bluetooth #
On your computer, open Bluetooth settings and add a new device. TriggerGrid appears as a keyboard. Click it.
There’s no PIN to type. The pad has no keyboard to type one on, so it uses “Just Works” pairing. The Bluetooth icon in the top-right of the pad’s status bar goes green when it’s connected.
Now open a text editor, select some text, and tap Copy, then Paste. If you get a second copy of your text, it works.
It remembers the pairing. Turn the pad off and on again and it reconnects on its own, no pairing again.
💡 Want to move it to a different computer? Tap the status bar to open the device menu and choose Forget Bluetooth. Then pair it with the new one.
Part 5: Get it on your Wi-Fi #
The pad doesn’t know your Wi-Fi yet, so it has started its own hotspot, TriggerGrid-XXXX.
5.1 Join the hotspot #
Tap the status bar at the top of the pad. The device menu opens, with the hotspot name, its password and a QR code. Point your phone’s camera at the QR code and it offers to join. No typing.
The hotspot always uses WPA2 with a random password generated on first boot. It’s never an open network.
5.2 Pick your home network #
With your phone on the hotspot, open http://192.168.4.1. Go to Settings, click Find networks in the Wi-Fi card, pick yours, enter the password and click Join and restart.
The pad restarts and joins your Wi-Fi. From now on, from any device on that network, it’s at:
http://triggergrid.local
Bookmark it.
💡 If it can’t reach your Wi-Fi (new router, you’ve moved house), it waits 10 seconds and then falls back to the hotspot on its own. To force hotspot mode any time, hold the status bar for 3 seconds.
Part 6: Build your first page #
Open triggergrid.local. This is the editor:
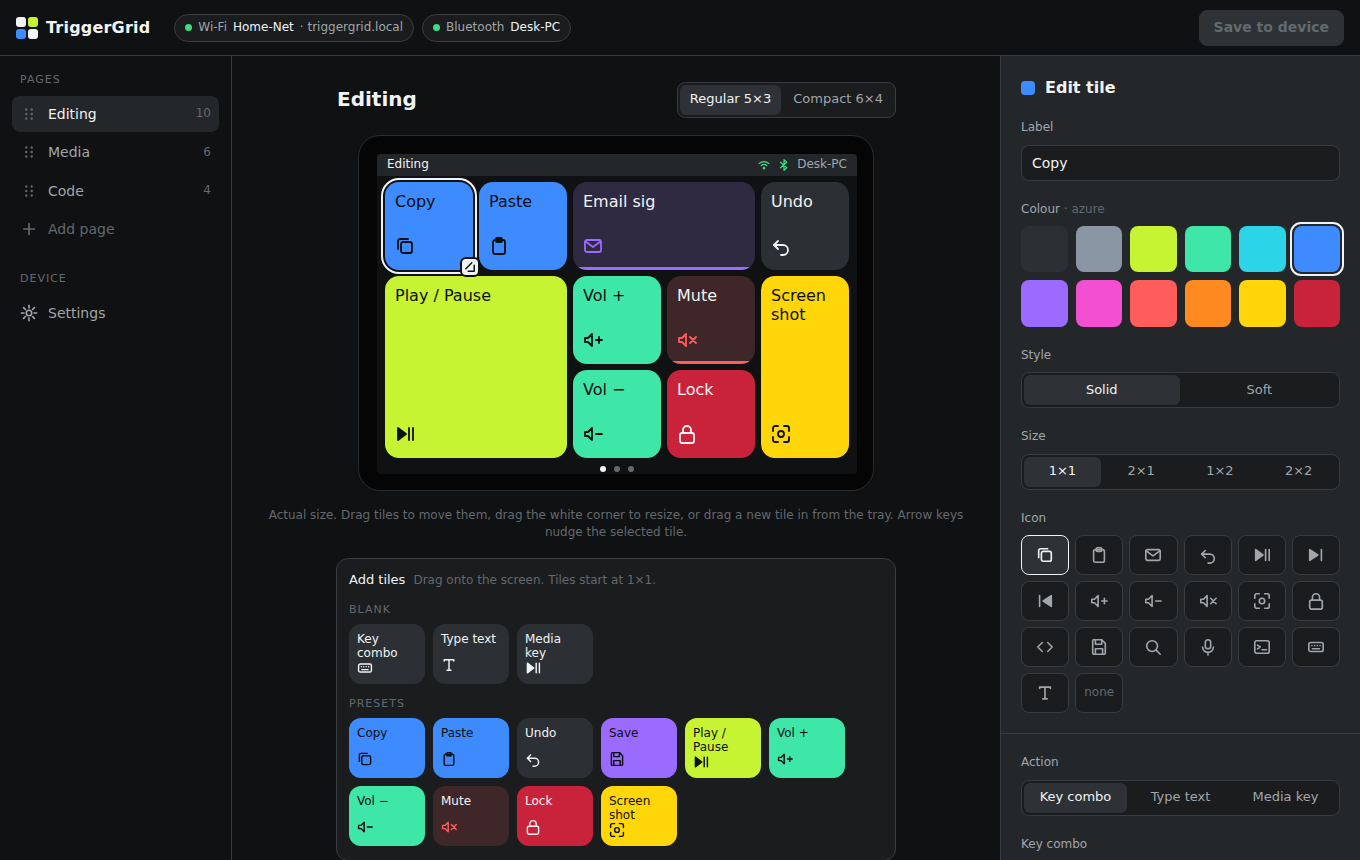
The preview in the middle is actual size. Hold your pad up to the screen and they match. What you see is what the pad draws, same fonts, same icons, same colours.
6.1 Add and arrange tiles #
- Drag a tile in from the tray under the preview: a blank Key combo, Type text or Media key, or a ready-made preset like Copy or Vol +.
- Drag a tile to move it. Drag its white corner to resize it.
- Drag a tile back onto the tray to delete it.
- Arrow keys nudge the selected tile one cell.
A dashed outline shows where the tile will land. It turns red if the spot is taken or off the edge, and dropping there does nothing.
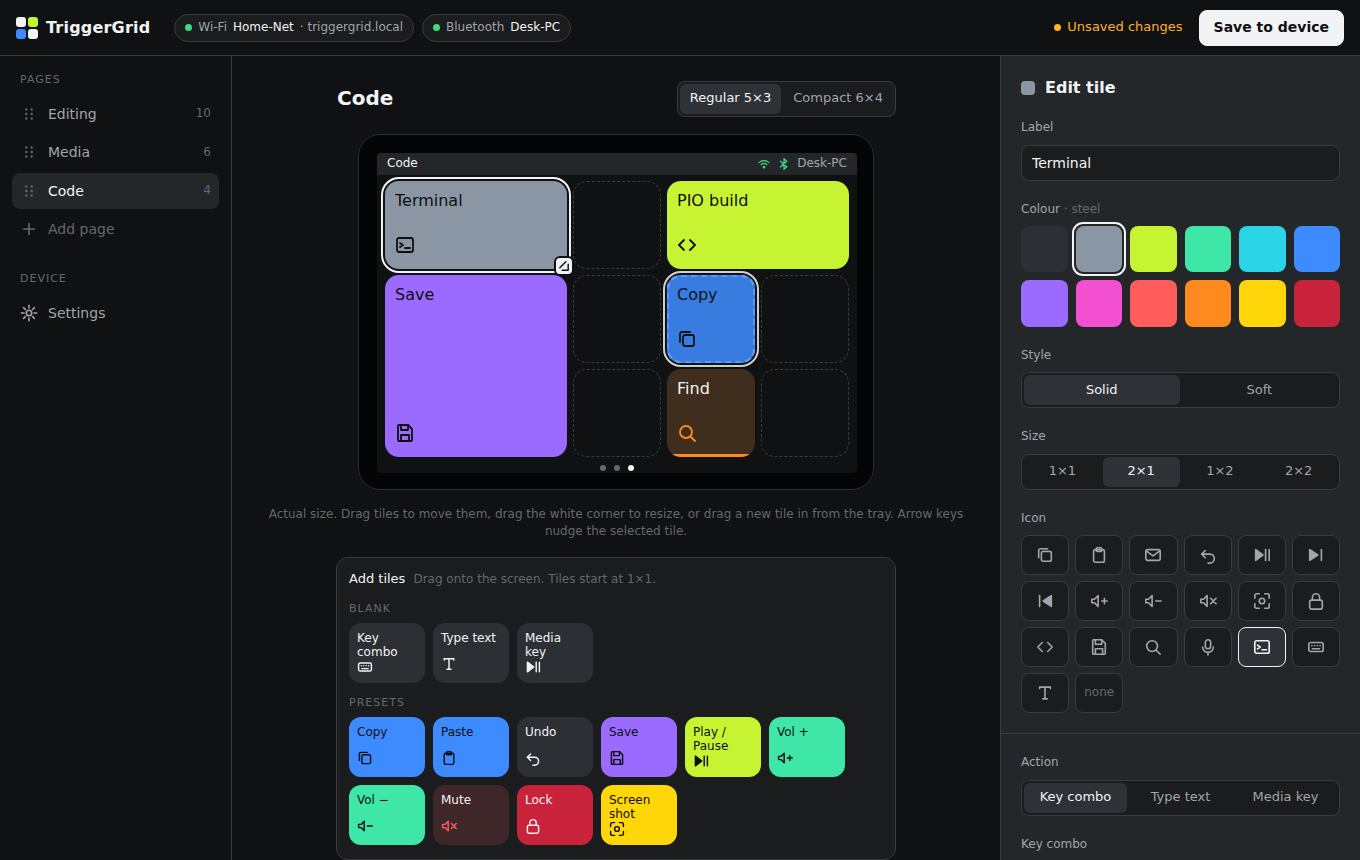
6.2 Set up a tile #
Tap a tile and the editor on the right opens:
- Label: one or two words. The pad isn’t the place for descriptions.
- Colour: pick from twelve swatches. There’s no free colour picker, on purpose. Every swatch was checked for contrast with its label and checked on the actual screen, so every layout stays readable.
- Style: Solid fills the tile. Soft is a dark tile with a hint of the colour, a coloured icon and a coloured bar along the bottom, good for less important buttons.
- Size and Icon.
- Action: the key combo, text or media key.
For a key combo, don’t bother picking keys from lists. Click Record combo and press the shortcut on your keyboard. It fills itself in.
Then click Try it. The pad sends that action to your computer right now, without saving, so you can check it does what you think before you commit.
6.3 Save #
Click Save to device. The pad redraws with your new layout a moment later. No restart, no cable.
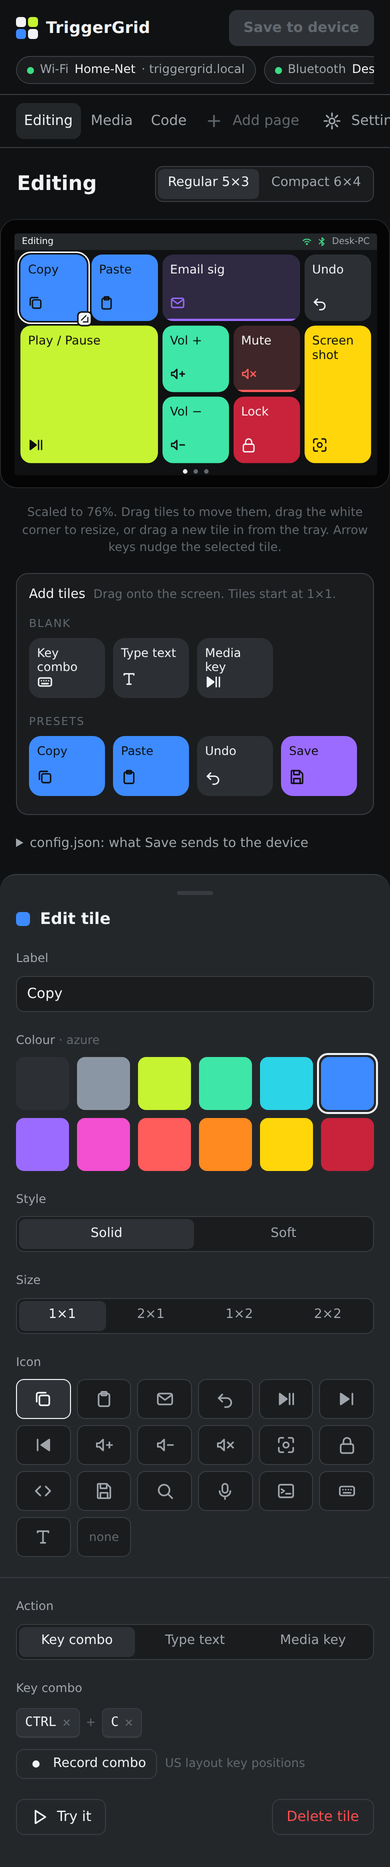
It works just as well from a phone. The preview scales down and the tile editor slides up from the bottom:
Part 7: Type text, including the awkward characters #
A Type text tile types up to 1,024 characters for you, including line breaks and tabs. My email signature is one. So are a couple of code snippets I’m sick of typing.
Plain English text just works. Accents, symbols and emoji are where it gets interesting, and it’s worth knowing why.
Why é is hard for a keyboard #
A Bluetooth keyboard doesn’t send characters. It sends key positions. It says “the key third from the left on the second row was pressed”, and your computer decides that means e. There is no key position for é, € or 👋.
So to type those, the pad has to do what you’d do: use your operating system’s own way of typing any character by its code. Every OS has one, and they’re all different:
| Computer | How it’s typed | Covers | One-time setup |
|---|---|---|---|
| macOS | Hold Option, type the hex code | Everything, including emoji | Add Unicode Hex Input in System Settings → Keyboard → Input Sources, and switch to it |
| Linux | Ctrl+Shift+U, hex code, Space | Everything, including emoji | None on GNOME/Ubuntu |
| Windows | Hold Alt, type the code on the numpad | Western accented letters and € £ © ° – — “ ” … |
None |
| Windows | Alt + numpad + + hex code |
Most other characters and emoji, in most apps | A registry setting (the editor tells you which) |
The pad needs to know which one to use, so in Settings, tell it which Computer it’s paired with.
The editor then shows you, under the text box, how many keystrokes the text will take and which characters need the special method. Where it’s unreliable, it says so:
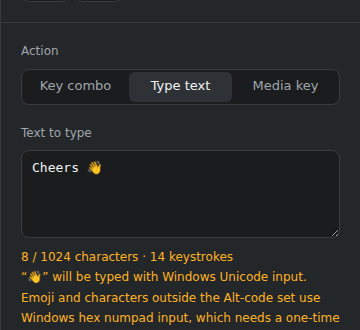
Eight characters, fourteen keystrokes. The emoji alone takes seven.
⚠️ Emoji on Windows are the weak spot. The hex method works in a lot of apps but not all of them, and there’s nothing the pad can do about that. If you’re on Windows, test emoji tiles with Try it in the app you’ll actually use them in.
💡 If characters go missing in a long piece of text, raise Delay between characters in the tile editor. The default is 10 ms, and some apps can’t keep up with that.
Part 8: Lock it down and back it up #
A gadget that types into your computer, controlled from a web page, deserves a little care. Open Settings:
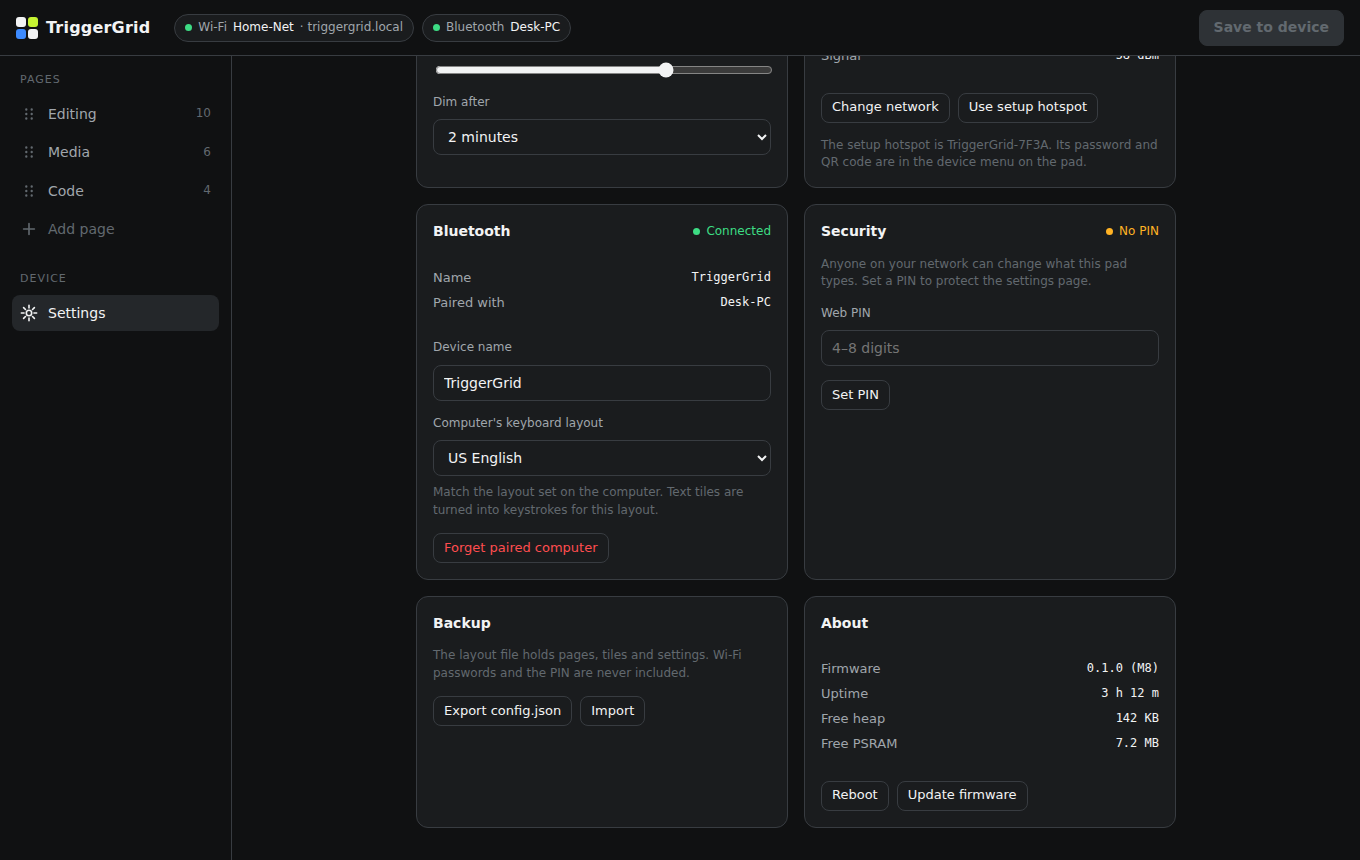
- Set a PIN. Without one, anyone on your Wi-Fi can open the page and change what your pad types. With one, they can’t. The PIN is stored on the pad, and it can only be changed from the pad or with the current PIN.
- Export config.json. That’s your whole layout in one file. Keep a copy. Your Wi-Fi password and PIN are never in it, so it’s safe to share. Import it on another pad and you have the same layout.
- Update firmware. When there’s a new version, build it in VS Code and upload the
.binhere. The pad installs it and restarts, and the setup page updates along with it. - Dim after: how long before the screen dims. Pick “Never” if you want it always on.
Under the hood: everything this board gets wrong #
If you just want a macro pad, you’re done. This part is for anyone who wants to write their own code for this board, because this board will fight you. Nearly every one of these cost me an evening. All of them are written up, with fixes, in the project’s hardware doc.
1. The default screen setup gives you a blank screen #
The display library supports this screen’s controller chip (the AXS15231B), but its default setup sequence is for a different panel, a long skinny 180×640 one. Use it and the screen shows nothing, or a single dashed line.
You have to pass the right one explicitly:
Arduino_GFX *gfx = new Arduino_AXS15231B(
    bus,
    GFX_NOT_DEFINED,   // reset pin: don't pass it, it breaks setup on some units
    0,                 // rotation: must stay 0 (see below)
    false,             // IPS flag: false with this setup sequence
    320, 480,
    0, 0, 0, 0,
    axs15231b_320480_type1_init_operations,         // the one that works
    sizeof(axs15231b_320480_type1_init_operations));
2. You can’t rotate the screen #
The panel is built portrait (320 wide, 480 tall). The case stands it landscape. Normally you’d just tell the screen to rotate. Here, every way of doing that breaks:
- The screen chip’s own rotation command: blank or corrupted screen.
- LVGL’s rotation at 90°: garbage.
- LVGL’s rotation at 270°: every row shifted, and stripes.
What works is to tell LVGL (the graphics library) the screen is 480×320 landscape, and turn the picture sideways yourself before sending it to the panel. The heart of it is a loop that moves each pixel to its new spot:
// LVGL draws a 480x320 landscape frame. Turn it 90° into the
// 320x480 portrait frame the panel actually wants.
for (int row = 0; row < 320; row++) {
    for (int col = 0; col < 480; col++) {
        dst[col * 320 + (319 - row)] = src[row * 480 + col];
    }
}
Touch has to be turned the same way, or your finger lands in the wrong place: x = py, y = 319 − px.
3. The screen only takes whole frames #
This one was a puzzle. I drew a test pattern of seven colour bands and got one blue bar at the top. The serial log said everything was fine.
It turns out that over this board’s connection (QSPI), the panel ignores where you ask it to draw. Every drawing starts at the top-left, so each band drew over the last one, and blue was drawn last.
The fix: never draw straight to the panel. Build the whole picture in memory and send it all in one go, from the top-left corner, every time.
4. …which made swiping slow #
Drawing and sending the whole screen every frame worked, but swiping between pages felt slow and choppy.
The fix was to let LVGL redraw only the parts that changed, in the ESP32’s fast internal memory, then copy those parts into the full frame and send the whole frame once. The panel still gets whole frames, so rule 3 holds, but most of the work shrinks to the few tiles that actually moved.
5. New memory is full of old pictures #
The big frame buffers live in the board’s 8 MB of PSRAM (extra, slower memory). ps_malloc() gives you memory without clearing it, and PSRAM keeps its contents across a restart. The result was multicoloured noise from the last boot showing up in any part of the screen that hadn’t been drawn yet.
The fix is one line after every allocation:
memset(buf, 0, size); // ps_malloc doesn't clear memory
6. Touch needs a secret handshake #
The touch chip returns all zeros unless you send it an 8-byte “unlock” command before every read. There’s no public documentation for this. It was worked out from the ESPHome driver.
static const uint8_t UNLOCK[8] = { 0xb5, 0xab, 0xa5, 0x5a, 0x00, 0x00, 0x00, 0x08 };
Wire.beginTransmission(0x3B);
Wire.write(UNLOCK, 8);
Wire.endTransmission();          // a full stop, NOT endTransmission(false)
Wire.requestFrom(0x3B, 8);       // now the 8 bytes mean something
There’s more. A single tap fires three to six interrupts. The data is only good for about a millisecond after each one, and there’s no “finger lifted” signal at all (you decide the finger’s gone when nothing arrives for 80 ms). Drawing a frame takes tens of milliseconds, so the main loop would miss nearly every touch. Touch gets its own small task on the other CPU core, woken by the interrupt.
7. The small stuff #
- LVGL’s clock doesn’t tick on its own when it’s built as a PlatformIO library. Feed it by hand with
lv_tick_inc()inloop(), or animations freeze and touch does nothing. - The board reports 8 MB of flash instead of 16 unless you add
board_upload.flash_size = 16MBtoplatformio.ini. The generic board definition assumes 8. - It needs the pioarduino platform (Arduino core 3.x), not PlatformIO’s default
espressif32. The display library won’t compile on the old core. - F13–F24 silently do nothing if your keyboard descriptor’s key range stops at
0x65, as lots of examples online do. It needs to reach at least0x73. Those keys are perfect for macro pads, because no normal keyboard has them and apps rarely use them. - After changing a shared header, do a clean build. PlatformIO sometimes keeps the old compiled code, and you’ll flash firmware that ignores your change.
💡 The habit that saved me: every time the board did something weird, the symptom, the cause and the fix went into the hardware doc. The next time something looked similar, the answer was already written down. For Claude as much as for me.
📖 Full detail: Hardware doc: board facts, LVGL setup and known problems
The design decision that made it work: thin device, smart browser #
This was the most important decision in the project, and it came early.
The ESP32-S3 isn’t tiny: two 240 MHz cores, 8 MB of PSRAM. But the resources that actually run short are the fast internal memory (about 320 KB, shared by Wi-Fi, Bluetooth and the graphics) and time. Every millisecond the pad spends on a web request is a millisecond it isn’t drawing the screen or sending a keystroke.
So the rule is:
The pad stores, streams and acts. The browser thinks.
The layout file has two halves. The editor half is the human-readable one: tile labels, colour names, key names, your text. The browser edits that half. When you save, the browser compiles it into the pad half: final RGB colours, icon numbers, raw keyboard codes, and your text as a ready-to-play list of keystrokes.
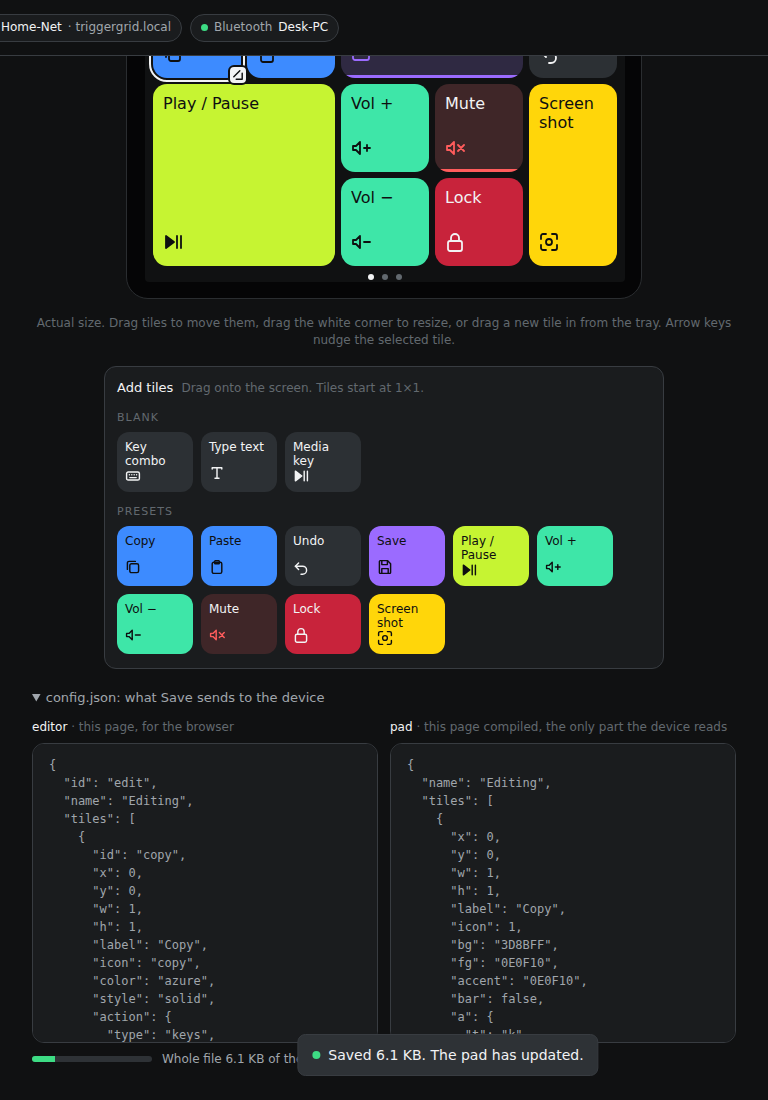
The pad only ever reads the pad half. So CTRL + C in the editor arrives at the pad as:
"a": { "t": "k", "m": 1, "k": [6] }
Modifier 1 (Ctrl), key 6 ©. The pad has no idea what “Ctrl” or “C” means, and doesn’t need to.
What that buys:
- The pad has no lookup tables. No key names, no keyboard layouts, no colour maths, no Unicode rules. All of that lives in JavaScript, where it’s easy to test.
- Most of the code is testable without the board. The compiler has its own test page that runs in any browser. The web page even has a pretend pad built in, so you can open it straight from disk and work on it with nothing plugged in.
- Adding a keyboard layout (UK, German…) is a browser-only change. No reflashing.
- The web page is built into the firmware, gzipped at build time. One firmware update brings the matching page with it, so they can never get out of step.
The pad still checks what it’s given. Anyone on the network could send it a request, so it checks every count, size and grid position is in range before using it. It doesn’t need to know what a key means to know a number is too big.
📖 Full detail: Architecture: modules, threads, web API and security
Building hardware with Claude #
A few things I learned about building hardware with an AI that can’t see the hardware:
You are the eyes. Claude can’t flash the board or look at the screen. So every milestone ended with a list of what I should see on the pad and in the serial log. “The colour bars fill the panel and all four edges of the rectangle are visible.” If I saw something else, I described it exactly, and that description was usually enough to find the cause.
Put the rules where they can’t be missed. CLAUDE.md has a section literally called Hard rules (the board breaks otherwise). Never use hardware rotation. Only send whole frames. Clear every PSRAM buffer. Once a rule was in there, it stayed fixed.
Log what you’ll need to debug. The pad prints how long each frame takes to draw and send. When dimming didn’t work the first time, the fix started with adding the idle time and power state to the serial log, so I could see which part wasn’t happening instead of guessing.
Small milestones, each one visible. “Draw colour bars.” “Put a label in each corner.” “Make a dot follow my finger.” Each one was small enough that when it didn’t work, there were only a few things it could be.
Write it for someone else to read. The project doubles as a teaching reference, so the rule was clarity beats cleverness. That made the code easier for me to review, and easier for Claude to pick up again in a fresh session.
Troubleshooting #
“The screen is blank after flashing.”
If you’re running the TriggerGrid code unchanged, check the serial log. If it says PSRAM: … (ok) and the backlight is on, try unplugging the board and plugging it back in. If you’ve changed the display code, you’ve almost certainly lost the axs15231b_320480_type1_init_operations setup sequence. See problem 1.
“Upload fails with PermissionError 13 / port busy.”
A previous monitor window is still holding the USB port. Close other PlatformIO terminals. On Windows, if that doesn’t do it:
Get-Process pio, python | Stop-Process -Force
“I changed the code but the pad behaves the same.”
PlatformIO kept the old compiled code. Run Clean (PlatformIO sidebar → General → Clean), then upload again.
“triggergrid.local doesn’t open.”
Some devices, older Android phones especially, don’t understand .local names. Tap the status bar on the pad; the device menu shows its IP address. Use that instead.
“It won’t pair with my other computer.”
It’s still bonded to the first one. Device menu → Forget Bluetooth, then pair again.
“Emoji don’t type on Windows.”
Check the registry setting the editor tells you about, then sign out and in again. Even then, some apps ignore that input method entirely. Try the same tile in Notepad to see whether it’s the pad or the app.
“Text tiles drop characters.”
Raise Delay between characters in the tile editor. Try 20–30 ms.
“The serial log says Flash: 8192 KB.”
board_upload.flash_size = 16MB has gone missing from platformio.ini. Put it back.
What I’d tell you before you start #
Buy the board and just flash it. You don’t need to understand any of the Under the hood section to have a working macro pad in half an hour.
Use F13–F24 for anything custom. Want a tile that toggles your mic in Teams, or runs a script? Give it F13 and map F13 to that action in the app or with a tool like AutoHotkey. Nothing else on your computer is using those keys.
Start with fewer, bigger tiles. The Compact grid fits 24 buttons on a page, and it’s tempting. But the tiles I actually use are the big ones I can hit without looking.
Set a PIN. It’s a thing that types on your computer. Thirty seconds.
If you write code for this board, read the hardware doc first. Seriously. Every one of those problems looks like your bug when it happens, and none of them are.
Write everything down. With or without AI, the project got faster the moment every lesson went into a file in the repo rather than into my head.
The honest summary #
I took a cheap touchscreen board and turned it into a macro pad that works with any computer, needs nothing installed, and gets set up from my phone. It copies, pastes, types my sign-off and runs my music, and it looks good doing it.
The board fought me on the screen, the rotation, the touch and the memory, and every one of those fights is now written down so you don’t have to have them.
If you’ve been eyeing a macro pad and balking at the price or the software, this is an afternoon project, and most of the afternoon is choosing tile colours.
Links and further reading #
This project
- TriggerGrid on GitHub: firmware, web page and docs
- Hardware doc: pinout, LVGL setup, every known problem and fix. Read this one
- Architecture: how it fits together, the web API, security
- Config format: the
config.jsonlayout file, including the Unicode typing rules - Roadmap: milestones M0–M10, each tagged in git
Tools
- VS Code
- PlatformIO IDE for VS Code
- pioarduino: the ESP32 platform with Arduino core 3.x
- Claude Code
Libraries
- LVGL: the graphics library that draws the tiles (docs)
- Arduino_GFX: the display driver
- NimBLE-Arduino: the Bluetooth stack
- ArduinoJson: reading the layout file
The same board would make a good smart-home panel, a timer, a status display or a tiny dashboard. The screen, rotation and touch fixes are the same whatever you build on it. Start from the hardware doc, and skip the evenings I lost.